top of page
Search

ree

In a previous article, I demonstrated how to monitor risky users flagged by HR, even if your organization hasn’t implemented the HR Data Connector yet. That article laid the groundwork for using IRM policies effectively in this specific scenario.

This follow-up dives deeper into the reasoning behind my choice of the "Data Leaks by Priority Users" policy template over the seemingly more obvious "Data Leaks by Risky Users" policy template.

Microsoft Purview Insider Risk Management provides a "Data Leaks by Risky Users" policy template, which at first glance seems ideal for monitoring HR-flagged users. Even the name screams “risky users”! It offers options to add users or groups to monitor, even without the HR Data Connector.


However, in the absence of the HR Data Connector, I found that this template is not quite suitable for maintaining the compliance and confidentiality required in environments dealing with sensitive HR data.


The Limitations of the "Data Leaks by Risky Users" Template


The biggest concern here is that users flagged by HR should not be exposed to unauthorized individuals. This information is highly sensitive, and mishandling it could lead to compliance violations or overexposure of individuals’ details. Sharing details about flagged users to a broader-than-intended audience can erode privacy safeguards.


Limited Group Options: It relies exclusively on M365 Groups and does not allow the use of Azure AD Security Groups. While M365 Groups are fine for collaboration, Security Groups are better suited for scenarios requiring strict access control. For HR-flagged users, Security Groups offer a more secure “hiding place” to manage sensitive data.


Broad Analyst Access: Policies created using this template can be viewed by Analysts assigned to cases generated by alerts. This creates a risk of exposing sensitive information about flagged users. Additionally, Analysts knowing who the users are could unintentionally introduce bias when reviewing alerts and resolving cases.


Global Reader Visibility: The policy is visible to Global Readers, a role often assigned broadly within organizations. This significantly increases the risk of overexposure, as sensitive information might be accessible to individuals who do not need to see it.


Pseudonymization Issues: The visibility of user details undermines pseudonymization, a critical compliance requirement in many organizations. Revealing flagged users' identities directly goes against the principle of protecting their privacy until necessary.


Manual Maintenance: This template requires manual updates whenever users need to be added or removed. This inefficiency adds administrative overhead and increases the chance of errors.


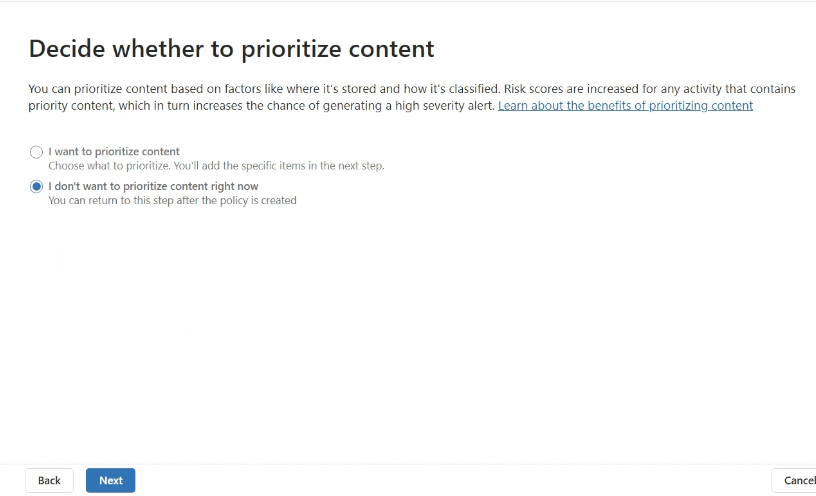
Why the "Data Leaks by Priority Users" Template is more appropriate


The "Data Leaks by Priority Users" template resolves all the above issues, making it a much better choice for this use case:


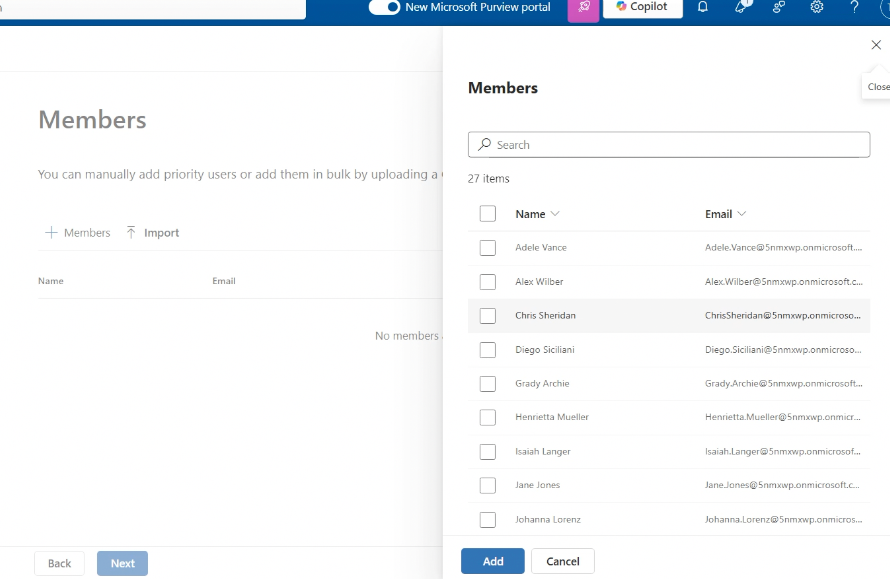
Enhanced Confidentiality:I t leverages a globally configured Priority User Group, which is accessible only by highly privileged roles like IRM Administrators and Insider Risk Management roles. This ensures sensitive data remains confidential.


Multiple Group Support: It supports multiple Priority User Groups in a single policy, providing flexibility and scalability. The membership of this groups is not available to those who can view the policy.


Dynamic Group Updates: The policy dynamically updates as users are added or removed from the Priority User Group, eliminating the need for manual modifications.


Compliance Alignment: Pseudonymization is preserved by displaying only the Priority Group name, aligning with compliance requirements and protecting user identities.


This approach ensures flagged users are monitored effectively without risking exposure or creating unnecessary administrative overhead.


  • Tatiana Slepukhin-Zamachnaia
  • 3 min read

ree

In this blog entry I am going to show you how to create a Priority User Group in IRM. Then I am going to demonstrate how to create an IRM Policy using Priority Users Policy Template.  


Business Case: IRM Policies with Priority User Group

Here are examples of the Priority Users that you might want to monitor:

1.       Administrators or other privileged access within M365.

2.       Users who have access to highly confidential information.

3.       New employees who have access to organization’s assets.

4.       A temporary project that gives access to its member to confidential information

5.       Users that are flagged by HR.


MS Purview has HR Data Connector that should be used for such scenarios. However, if for whatever reason your organization cannot implement HR Data Connector, you can leverage Priority Groups for the following users:

·       Resignation

·       Job level change

·       Bad performance review

·       Performance improvement plan


Note: Enabling HR Data Connector is a far superior and a more compliant solution – check a full review of its functionality, or learn how to automate HR Data Connector.


Create Priority User Group


Required Permissions:  Risk Management or Insider Risk Management Admins role.


Insider Risk Management allows you to create Priority User Groups in one location and then use Groups with any of its policies.


In MS Purview, go to Settings and select Insider Risk Management Settings.

ree

In the Settings, scroll down to locate “Priority user groups” and select it.


Click “Create priority user group”.


ree

Name your group and provide a description. I named mine HR-flagged users. This Priority User group will be monitoring users who submitted resignation or had a bad performance review.


In the “Members” screen you have two options. You can either add the members, or by uploading a CSV file. The CSV column where you list the user must be named user principal name.  You can add up to 10,000 users to a priority user group.

ree

I added two users manually.


ree

Next screen will let you choose users who can view data involving users in this priority group. You need to have at least one user selected.


It is a good idea to make sure that only authorized users have access to this priority group, particularly since this group is dealing with employees that are flagged by HR.


Note that you if you are selecting an individual user, instead of Email, you will see the Permission for a user. You can also select the Role Group.


ree

Click Next.


Review group settings and submit.


The Priority User Group is created.

ree


Create IRM Policy


Next go to Insider Risk Management solution and then to Policies.


Click “Create Policy” and select “Custom Policy”.


ree

Select “Data Leaks by priority users” template. Note that the required prerequisite here is a “Priority user group”, which we already created for this policy.


ree


Click Next and name the policy. I named it “HR-flagged users Policy”


ree


In the next screen we need to specify a priority user group.


Click “Add or edit priority user groups”. Note that you can choose up to 10 priority user groups for a policy.


Select the group and click “Add”.


ree


Click “Next”


We do not want to prioritize content for this Policy. We want this Policy to monitor all content that these priority users have access to. So I am going to select “I don’t want to prioritize content right now”.


ree


For the triggering event I am going to choose “User performs an exfiltration activity” and keep all activities selected.


ree

Click Next.


I always adjust thresholds for triggering events, so I select a second option “Choose your own thresholds” and adjust thresholds as needed.


ree

Thresholds adjustment is always specific to your specific business needs, so adjust them the way that makes more sense to your organization. 


In the Indicators screen, I keep all selections and click Next.

ree

I keep all Detection options and click Next.

ree

I keep “Apply threshold type for indicators" as is, using defaults provided by Microsoft, and click Next.

ree

Review the settings and finish.


The IRM Policy to monitor Priority users is created.


ree

NOTE: If you delete a priority user group, the policy will no longer be active and will not generate any alerts. 

Watch the video here: https://youtu.be/-YNz4uiTKH8


Insider Risk Management (IRM) in Microsoft Purview provides organizations with powerful tools to monitor, detect, and respond to potentially risky activities.

One important risk indicator is when users downgrade or remove sensitivity labels from files, and then exfiltrate the file or otherwise mishandle sensitive data.

I will guide you through the steps to configure IRM policy that generate alerts related to files that are labeled with a sensitivity label.

Why Monitoring a Particular Sensitivity Label Matters


When labels are downgraded—for example, changing a file labeled "Top Secret" to "Confidential"—it can indicate:

  • An attempt to bypass restrictions tied to higher-level labels.

  • Malicious intent to exfiltrate sensitive data.

  • Unintentional actions by users that could lead to data exposure.

Detecting and responding to such actions in real time is crucial for safeguarding critical information.


Focusing on Your Most Sensitive Assets


Organizations often use a variety of sensitivity labels to classify their data based on its importance and level of sensitivity. For instance, you might have:

  • Public: For content intended to be freely accessible or shared externally without restrictions.

  • Internal Only: For content that should remain within the organization but is not highly sensitive.

  • Confidential: For content that is sensitive and requires restricted access.

  • Top Secret: For the most sensitive content that requires the highest level of protection.

While it's essential to maintain oversight of all classified content, you might want to prioritize monitoring your most sensitive assets. For this example, we will focus on monitoring the "Top Secret" label.

By narrowing your monitoring scope to high-priority labels like "Top Secret," you can detect and respond more effectively to actions that pose significant risks.

ree

Create IRM Policy


In Microsoft Purview, navigate to the Insider Risk Management solution.


Go to Policies. Click “Create policy” and select “Custom Policy.”


ree

Choose “Data Leaks” Policy template in “Data Leaks” Policy Templates section.


ree


Name your Policy and click Next.


In the “Exclude User and Group” screen, click Next to skip.


“Decide whether to prioritize content” screen is the most important one for our purpose. The selections in this screen define what IRM will monitor for this policy.


ree

Keep “I want to prioritize content” enabled.


Then, clear all content except “Sensitivity labels.”


Next screen will allow you to choose which Sensitivity label you want this policy to prioritize. You can choose up to 50 labels.

ree

I am going to select “Top Secret” label and add it.


Next screen will let you decide if you want this policy to score only activity with priority content.


You have two options:

  1. Get alerts for all activity, regardless of whether they include priority content.

  2. Get alerts only for activity that includes priority content. Activities without priority content won’t be scored. You can still be able to review them if an alert is generated.

ree

Make sure that you select “Get alerts only for activity that includes priority content” so that we are only monitoring the “Top Secret” label for this policy.


Next screen will allow us to choose triggering event for this policy. We will use “User performs an exfiltration activity” option. It has a number of activities that can trigger the policy.


ree

Note: make sure that your IRM is properly configured and all your indicators are enabled in the IRM settings.

Scroll down to view Sequences that include downgrading sensitivity label.


To learn about the sequences, follow this link.

In a nutshell, sequences are the activities that are executed by the user as one sequence, rather than isolated events.


ree

There are four different sequences that involve downgrading Sensitivity Labels:

  • Downgrade or remove label then exfiltrate

  • Downgrade or remove label, download, then exfiltrate

  • Downgrade or remove label, download, exfiltrate, then delete

  • Downgrade or remove label, download, obfuscate, then exfiltrate


I kept all activities selected for this Policy.


In the next screen we are going to choose thresholds for triggering events. You can apply built-in thresholds or choose your own thresholds.


Click “Choose your own thresholds.”


ree


The policy will trigger the alerts when the number of activities meet a certain threshold.


I am going to modify thresholds for all activities that are matching priority content, which is our Sensitivity Label “Top Secret.”


I set all thresholds for activities matching priority content to 1. I don’t want to take any chances with “Top Secret” label. One activity is too many.


ree

In the Indicators screen, click "Next" - this will keep all indicators selected.


In the next screen, “Sequence detection,” I am going to select all sequences and click “Next.”

I will keep thresholds provided by Microsoft for the indicators and click Next.


Review and Submit your policy.


Conclusion


By configuring IRM policies to monitor Priority Content for specific sensitivity labels, you can partition the policies in such a way that when alerts are triggered, your investigators will be able to differentiate these alerts from those triggered by other activities.


This ensures that potential data leaks involving the most sensitive content are quickly detected and prioritized over other alerts. Watch the video on YouTube: https://youtu.be/tMJIO2bMGt4


© 2024 Cloud Confidential Inc.

bottom of page